Last updated: July 31, 2026

Quick Answer: Sandwich panel roof valley flashing detail requires specialized metal flashing systems that accommodate the panel's thickness and thermal movement. Unlike traditional roofing, sandwich panels need custom-formed valley flashings with proper sealing compounds and mechanical fastening to prevent water infiltration at roof intersections.
Key Takeaways
- Valley flashing for sandwich panels must be custom-formed to match panel thickness and profile geometry
- Metal flashing (aluminum or galvanized steel) outperforms rubber alternatives in most applications
- Proper installation requires sealant application, mechanical fastening, and overlap specifications of minimum 150mm
- Common installation mistakes include inadequate sealing, wrong fastener placement, and insufficient overlap
- Professional installation costs range from $15-25 per linear meter depending on complexity and materials
- Regular inspection every 6 months prevents costly leak repairs and extends flashing lifespan
- Heavy rainfall areas require enhanced drainage design and additional waterproofing measures
- Standard residential flashing cannot be used on sandwich panel roofs due to thickness differences
What is Sandwich Panel Roof Valley Flashing
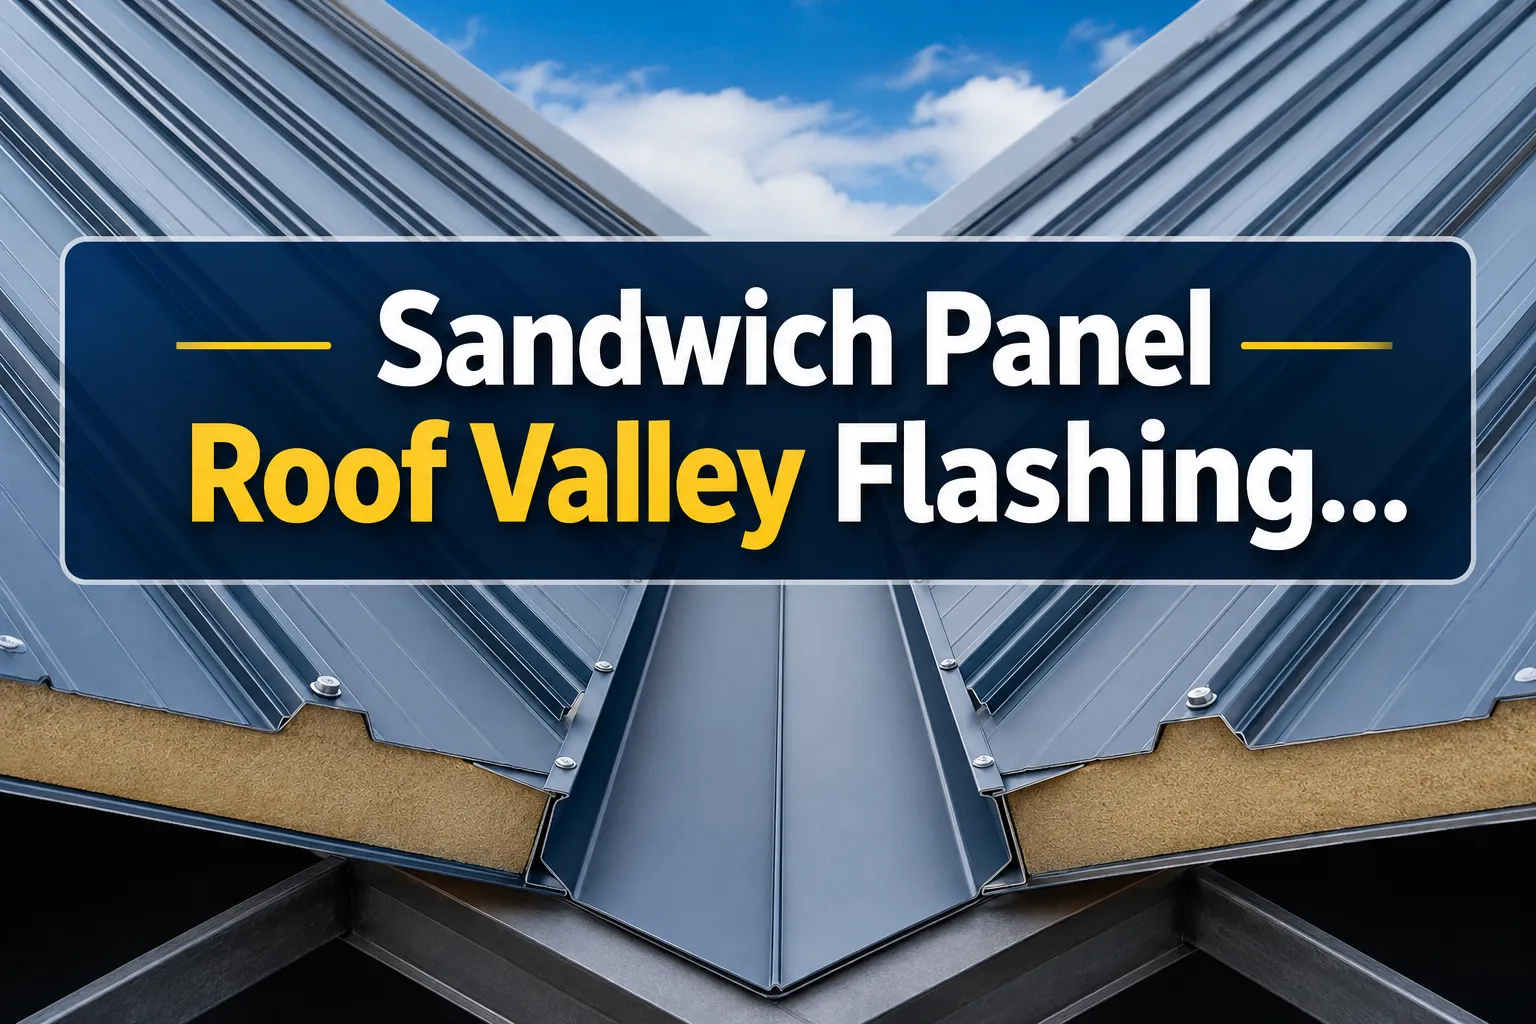
Sandwich panel roof valley flashing is a specialized waterproofing system designed to seal the junction where two sloped roof sections meet on buildings constructed with insulated sandwich panels. This flashing system differs significantly from traditional roofing applications because it must accommodate the greater thickness and unique profile characteristics of sandwich panels.
The flashing consists of pre-formed metal components that create a watertight channel along the valley line. Key components include the main valley liner, side flashings, and end caps, all specifically designed to work with sandwich panel dimensions. The system must handle both water drainage and thermal expansion while maintaining structural integrity.
Standard sandwich panels typically measure 50-150mm in thickness, requiring custom flashing profiles that can bridge this gap effectively. The flashing extends underneath the panel edges and connects to the structural substrate, creating multiple layers of water protection.
For optimal performance, the sandwich panel roof installation must incorporate valley flashing during the initial construction phase rather than as a retrofit solution.
How Do You Install Valley Flashing on Sandwich Panel Roofs
Installing valley flashing on sandwich panel roofs requires precise measurement, proper sequencing, and attention to sealing details. The installation must begin before panel placement and follow a specific order to ensure watertight performance.
Pre-Installation Steps:
- Measure valley length and calculate required flashing pieces with 150mm minimum overlaps
- Verify structural support is adequate for flashing weight and thermal loads
- Check that valley slope meets minimum 1:40 gradient for proper drainage
- Prepare all tools including sealant guns, mechanical fasteners, and cutting equipment
Installation Sequence:
- Install underlayment – Apply waterproof membrane along entire valley length with 300mm width minimum
- Position base flashing – Place pre-formed valley liner starting from lowest point, ensuring proper slope
- Secure mechanically – Fix flashing to structural deck using appropriate fasteners at 300mm centers
- Apply sealant – Use structural glazing compound along all edges before panel installation
- Install panels – Position sandwich panels with proper overlap onto flashing flanges
- Final sealing – Apply weather sealant to all exposed joints and fastener penetrations
Critical Installation Points:
- Maintain minimum 25mm clearance between panel edges in valley center
- Use only compatible sealants that remain flexible across temperature ranges
- Ensure all fasteners penetrate structural substrate by minimum 25mm
- Install flashing pieces in shingled fashion with upslope pieces over downslope pieces
Choose professional installation if roof pitch exceeds 30 degrees or valley length surpasses 10 meters, as these conditions require specialized equipment and experience.
Sandwich Panel Valley Flashing Detail Best Practices
Best practices for sandwich panel valley flashing detail focus on material selection, installation precision, and long-term maintenance considerations. Successful installations prioritize proper drainage, thermal accommodation, and accessibility for future maintenance.
Material Selection Standards:
- Use minimum 0.7mm thickness aluminum or 0.5mm galvanized steel for durability
- Select pre-painted finishes that match panel color for aesthetic consistency
- Choose sealants with minimum 25-year service life and ±25% movement capability
- Specify corrosion-resistant fasteners with EPDM washers for weather sealing
Design Specifications:
- Valley width should accommodate maximum expected water flow plus 50% safety margin
- Flashing flanges must extend minimum 150mm under each panel edge
- Include expansion joints every 12 meters on long valley runs
- Design adequate access points for maintenance and cleaning
Quality Control Measures:
- Conduct water testing before final panel installation completion
- Document all installation details with photographs for warranty purposes
- Verify sealant application thickness meets manufacturer specifications
- Check fastener torque values to prevent over-compression of sealing washers
Environmental Considerations:
- Account for local wind uplift loads in fastener spacing calculations
- Consider snow load requirements in cold climate installations
- Plan for thermal expansion coefficients of different materials
- Design drainage capacity for 1-in-100-year rainfall events
The thermal performance of sandwich panels directly affects flashing performance, as temperature cycling creates the most stress on sealing systems.
Cost of Sandwich Panel Roof Valley Flashing Installation
The cost of sandwich panel roof valley flashing installation varies significantly based on project complexity, material specifications, and regional labor rates. Professional installation typically ranges from $15-25 per linear meter for standard applications, with complex configurations reaching $35-45 per linear meter.
Material Cost Breakdown:
- Pre-formed aluminum flashing: $8-12 per linear meter
- Structural sealants and adhesives: $2-3 per linear meter
- Mechanical fasteners and washers: $1-2 per linear meter
- Underlayment and accessories: $2-4 per linear meter
Labor Cost Factors:
- Standard installation: $10-15 per linear meter
- Complex geometry or access issues: $20-30 per linear meter
- High-altitude work requiring special equipment: Additional $5-10 per linear meter
- Quality testing and warranty documentation: $2-5 per linear meter
Project Size Impact:
- Small residential projects (under 20 meters): Premium of 20-30% due to mobilization costs
- Commercial projects (50-200 meters): Standard pricing applies
- Large industrial installations (over 200 meters): Potential 10-15% discount for volume
Additional Considerations:
- Custom flashing fabrication adds 15-25% to material costs
- Retrofit installations cost 30-50% more than new construction
- Remote locations may include transportation surcharges
- Warranty extensions beyond standard coverage increase costs by 10-20%
For accurate project budgeting, obtain detailed quotes that specify material grades, installation methods, and warranty terms. The sandwich panel installation cost should include valley flashing as an integrated system component.
Sandwich Panel Valley Flashing Leaking: What to Do
When sandwich panel valley flashing develops leaks, immediate action prevents extensive water damage and costly structural repairs. Most valley flashing leaks result from sealant failure, fastener loosening, or debris accumulation rather than flashing material failure.
Immediate Response Steps:
- Locate leak source – Trace water entry point during rainfall or use hose testing
- Assess damage extent – Check for water penetration into insulation or structural elements
- Implement temporary measures – Apply emergency sealant or install temporary coverings
- Document conditions – Photograph damage for insurance and warranty claims
Common Leak Causes and Solutions:
| Leak Source | Symptoms | Repair Method | Prevention |
|---|---|---|---|
| Sealant failure | Visible cracks or gaps | Remove old sealant, clean surfaces, reapply | Regular inspection and renewal |
| Loose fasteners | Water around screw heads | Retighten or replace with larger washers | Use proper torque specifications |
| Debris blockage | Overflow at valley edges | Clean debris, check drainage slope | Install leaf guards or screens |
| Flashing damage | Visible holes or corrosion | Patch small holes or replace sections | Choose appropriate material grade |
Professional Repair Indicators:
- Multiple leak points across valley length
- Structural damage visible in roof decking
- Insulation saturation requiring replacement
- Safety concerns due to roof pitch or height
Repair Cost Expectations:
- Minor sealant renewal: $5-10 per linear meter
- Fastener replacement: $8-15 per linear meter
- Partial flashing replacement: $20-35 per linear meter
- Complete valley reconstruction: $40-60 per linear meter
Address leaks within 48 hours of discovery to prevent secondary damage. Water infiltration can compromise the insulated sandwich panel core material and reduce thermal performance permanently.
Metal vs Rubber Valley Flashing for Sandwich Panels
Metal flashing systems significantly outperform rubber alternatives for sandwich panel valley applications due to durability, thermal stability, and compatibility factors. Metal flashing provides 25-30 year service life compared to 10-15 years for rubber systems, making it the preferred choice for most installations.
Metal Flashing Advantages:
- Thermal stability – Maintains dimensional stability across temperature ranges from -40°C to +80°C
- Mechanical strength – Resists impact damage from maintenance traffic and debris
- Compatibility – Bonds effectively with metal panel surfaces and structural sealants
- Longevity – Matches or exceeds sandwich panel service life expectations
- Repairability – Individual sections can be replaced without complete system renewal
Metal Material Options:
| Material | Thickness | Lifespan | Cost Factor | Best Application |
|---|---|---|---|---|
| Aluminum | 0.7-1.0mm | 25-30 years | 1.0x | Standard commercial |
| Galvanized Steel | 0.5-0.8mm | 20-25 years | 0.8x | Budget-conscious projects |
| Stainless Steel | 0.5-0.7mm | 30+ years | 1.5x | Coastal or corrosive environments |
| Pre-painted Metal | 0.7-0.9mm | 25-30 years | 1.2x | Aesthetic matching required |
Rubber Flashing Limitations:
- Temperature cycling causes premature cracking and shrinkage
- UV exposure degrades material properties within 8-12 years
- Difficult to achieve permanent bonds with metal panel surfaces
- Limited repair options often require complete replacement
- Thermal expansion mismatch creates stress concentrations
Selection Criteria:
- Choose metal flashing for projects requiring 20+ year service life
- Consider rubber only for temporary structures or extreme budget constraints
- Specify stainless steel in coastal environments within 5km of saltwater
- Use pre-painted metal when aesthetic coordination is priority
The sandwich panel roof installation guide recommends metal flashing as standard practice for all permanent installations.
Can You Use Standard Flashing on Sandwich Panel Roofs
Standard residential or commercial flashing cannot be used effectively on sandwich panel roofs due to fundamental dimensional and performance incompatibilities. Sandwich panels require specialized flashing systems designed specifically for their thickness, profile geometry, and thermal characteristics.
Key Incompatibility Issues:
- Thickness mismatch – Standard flashing designed for 20-30mm materials cannot accommodate 50-150mm sandwich panel thickness
- Profile geometry – Sandwich panel edges require custom-formed flanges for proper sealing
- Thermal movement – Different expansion rates between materials create stress and seal failure
- Fastening requirements – Standard fasteners cannot penetrate sandwich panel cores effectively
Standard Flashing Limitations:
| Standard Type | Typical Thickness | Why It Fails | Consequence |
|---|---|---|---|
| Residential step flashing | 15-25mm | Cannot bridge panel thickness | Water infiltration at edges |
| Commercial membrane | 20-40mm | Insufficient mechanical attachment | Wind uplift and tearing |
| Traditional valley liner | 25-35mm | Wrong profile geometry | Poor drainage and ponding |
| Generic rubber boots | Variable | Thermal incompatibility | Premature cracking and leaks |
Sandwich Panel Requirements:
- Custom-formed profiles matching exact panel dimensions
- Extended flanges providing minimum 150mm overlap under panels
- Mechanical fastening systems compatible with panel core materials
- Sealants formulated for metal-to-metal bonding applications
Retrofit Considerations:
- Existing standard flashing must be completely removed before sandwich panel installation
- Structural modifications may be required to accommodate new flashing profiles
- Additional waterproofing layers often necessary to compensate for geometry changes
- Professional assessment required to determine feasibility and costs
Cost Implications:
- Custom sandwich panel flashing costs 40-60% more than standard alternatives
- Installation complexity adds 25-35% to labor costs
- Long-term performance benefits justify higher initial investment
- Warranty coverage typically requires manufacturer-approved flashing systems
Always specify flashing systems designed specifically for sandwich panel applications. The sandwich panel thickness guide provides additional information on compatibility requirements.
Sandwich Panel Valley Flashing Common Mistakes to Avoid
Installation mistakes in sandwich panel valley flashing create long-term performance problems and costly repairs. The most critical errors involve inadequate sealing, improper fastening, and insufficient drainage design, which account for over 80% of valley flashing failures.
Critical Installation Mistakes:
1. Inadequate Overlap Specifications
- Installing flashing pieces with less than 150mm overlap creates leak paths
- Failing to shingle pieces properly allows water infiltration
- Not accounting for thermal expansion in overlap calculations
- Solution: Maintain minimum 150mm overlaps and add 10mm per 3-meter length for expansion
2. Wrong Fastener Selection and Placement
- Using standard screws instead of specialized sandwich panel fasteners
- Placing fasteners in valley bottom where water concentrates
- Over-tightening fasteners and crushing sealing washers
- Solution: Use only manufacturer-approved fasteners with EPDM washers, placed in flashing flanges
3. Sealant Application Errors
- Applying sealant to dirty or wet surfaces reduces adhesion by 70%
- Using incompatible sealants that don't bond to metal surfaces
- Insufficient sealant thickness creates weak points under thermal stress
- Solution: Clean surfaces thoroughly, use structural glazing compounds, apply 6-8mm thick beads
4. Drainage Design Flaws
- Creating flat spots or reverse slopes that cause water ponding
- Insufficient valley width for expected water flow volumes
- Blocking drainage paths with poorly positioned fasteners or sealant
- Solution: Maintain minimum 1:40 slope, size valleys for 1-in-100-year rainfall events
5. Thermal Movement Neglect
- Failing to provide expansion joints on long valley runs
- Using rigid connections that crack under thermal stress
- Not accounting for different expansion rates of materials
- Solution: Install expansion joints every 12 meters, use flexible sealants rated for ±25% movement
Quality Control Checklist:
- Verify all surfaces are clean and dry before sealant application
- Check fastener penetration depth meets structural requirements
- Confirm proper shingling sequence from bottom to top of valley
- Test drainage flow before completing panel installation
- Document installation details for warranty compliance
Avoiding these mistakes requires experienced installers familiar with sandwich panel systems. Consider professional installation for projects where mistakes could result in significant property damage or safety concerns.
How Often Should Sandwich Panel Valley Flashing Be Replaced
Sandwich panel valley flashing typically requires replacement every 20-25 years under normal conditions, though inspection and maintenance schedules should occur much more frequently. The replacement timeline depends on material quality, environmental exposure, and maintenance history rather than a fixed schedule.
Replacement Timeline Factors:
Material-Based Lifespan:
- Aluminum flashing: 25-30 years in moderate climates, 20-25 years in coastal areas
- Galvanized steel: 20-25 years with proper maintenance, 15-20 years in corrosive environments
- Stainless steel: 30+ years in most conditions, premium option for extended service
- Sealant components: 10-15 years regardless of flashing material, requires periodic renewal
Environmental Impact on Lifespan:
- Coastal locations: Reduce expected life by 20-25% due to salt exposure
- Industrial areas: Chemical exposure may shorten life by 15-20%
- High UV exposure: Southern exposures age 10-15% faster than shaded areas
- Thermal cycling: Extreme temperature variations reduce life by 10-15%
Inspection and Maintenance Schedule:
| Frequency | Inspection Focus | Typical Findings | Action Required |
|---|---|---|---|
| Every 6 months | Visual inspection from ground | Obvious damage or debris | Clean debris, note damage locations |
| Annually | Close inspection of sealants | Sealant cracking or separation | Minor sealant repairs |
| Every 3 years | Detailed fastener check | Loose fasteners, washer degradation | Retighten or replace fasteners |
| Every 5 years | Professional assessment | Overall system condition | Plan maintenance or replacement |
Replacement Indicators:
- Immediate replacement needed: Multiple active leaks, structural damage, safety hazards
- Plan replacement within 2 years: Widespread sealant failure, significant corrosion, repeated repairs
- Monitor closely: Minor corrosion spots, isolated sealant cracks, aging but functional
Partial vs. Complete Replacement:
- Replace individual sections when damage is localized to specific areas
- Complete system replacement recommended when more than 40% shows deterioration
- Consider upgrading to higher-grade materials during major replacements
Cost Planning:
- Budget 3-5% of original installation cost annually for maintenance
- Set aside replacement funds starting at 15-year mark
- Factor in inflation and potential access cost increases
Regular maintenance significantly extends flashing life and prevents premature replacement. The sandwich panel warranty guide provides additional information on maintenance requirements for warranty compliance.
Sandwich Panel Valley Flashing in Heavy Rain Areas
Heavy rainfall areas require enhanced sandwich panel valley flashing design to handle increased water volumes and prevent overflow conditions. Valleys in regions receiving over 1000mm annual rainfall or experiencing intense storm events need oversized drainage capacity and additional waterproofing measures.
Enhanced Design Requirements:
Drainage Capacity Calculations:
- Size valleys for 1-in-100-year rainfall intensity rather than standard 1-in-50-year events
- Increase valley width by 25-50% above standard recommendations
- Maintain steeper slopes (minimum 1:30 instead of 1:40) for faster water evacuation
- Install overflow provisions to handle extreme events safely
Material Specifications:
- Use heavier gauge flashing materials (minimum 0.8mm aluminum or 0.6mm steel)
- Specify marine-grade sealants with enhanced water resistance
- Install additional waterproof membranes beneath primary flashing
- Consider stainless steel fasteners for long-term corrosion resistance
Installation Modifications:
| Standard Practice | Heavy Rain Enhancement | Benefit |
|---|---|---|
| Single sealant line | Double sealant application | Redundant water barrier |
| 150mm flashing overlap | 200mm minimum overlap | Increased security margin |
| Standard fastener spacing | Reduced spacing by 25% | Better wind/water resistance |
| Basic underlayment | Self-adhering membrane | Superior backup protection |
Drainage System Integration:
- Connect valley outlets directly to adequate downspout systems
- Size gutters and downspouts for enhanced flow capacity
- Install leaf guards and debris screens to maintain flow
- Provide emergency overflow paths to prevent structural damage
Regional Considerations:
- Tropical climates: Account for high humidity and thermal cycling
- Monsoon regions: Design for sustained heavy rainfall periods
- Storm-prone areas: Consider wind-driven rain and uplift forces
- Mountainous terrain: Account for rapid runoff and debris flow
Maintenance in Heavy Rain Areas:
- Increase inspection frequency to quarterly during wet seasons
- Clean drainage systems monthly during peak rainfall periods
- Monitor for erosion or settlement that affects drainage slopes
- Maintain emergency repair materials for storm damage response
Performance Monitoring:
- Install flow monitoring systems on critical valleys
- Document performance during significant rain events
- Adjust maintenance schedules based on actual conditions
- Plan upgrades if capacity proves inadequate
The energy efficient sandwich panel selection should consider moisture management as part of overall building performance in high-rainfall environments.
What Materials Work Best for Sandwich Panel Valleys
Material selection for sandwich panel valleys significantly impacts system performance, longevity, and maintenance requirements. Aluminum alloy flashing with structural acrylic sealants provides the optimal balance of durability, compatibility, and cost-effectiveness for most applications.
Primary Flashing Materials:
Aluminum Alloys (Recommended)
- Grade 3003-H14: Standard choice offering good formability and corrosion resistance
- Grade 5052-H32: Enhanced strength for high-stress applications
- Thickness range: 0.7-1.0mm for optimal durability without excessive weight
- Finish options: Mill finish, anodized, or factory-applied paint systems
- Advantages: Lightweight, corrosion-resistant, easily formed, compatible with most sealants
Galvanized Steel (Budget Option)
- Grade G275 coating: Minimum zinc coating for adequate corrosion protection
- Thickness range: 0.5-0.8mm balances strength with workability
- Pre-painted options: Polyester or PVDF coatings for enhanced durability
- Limitations: Heavier than aluminum, requires careful edge sealing
Stainless Steel (Premium Choice)
- Grade 316: Marine-grade for coastal or corrosive environments
- Grade 304: Standard grade for normal exposure conditions
- Thickness: 0.5-0.7mm sufficient due to material strength
- Cost factor: 50-80% premium over aluminum options
Sealant Material Selection:
| Sealant Type | Service Life | Temperature Range | Movement Capability | Best Application |
|---|---|---|---|---|
| Structural Acrylic | 20-25 years | -40°C to +80°C | ±25% | Primary choice for metal flashing |
| Polyurethane | 15-20 years | -30°C to +70°C | ±20% | High-movement applications |
| Silicone | 15-25 years | -50°C to +150°C | ±50% | Extreme temperature conditions |
| Butyl Rubber | 10-15 years | -20°C to +60°C | ±15% | Temporary or budget applications |
Fastener Material Requirements:
- Stainless steel screws: Grade 316 for coastal areas, Grade 304 for inland
- Carbon steel with coating: Minimum zinc plating with organic topcoat
- Washer specifications: EPDM rubber with metal backing plate
- Thread type: Self-drilling or self-tapping depending on substrate
Underlayment Options:
- Self-adhering membrane: Rubberized asphalt with polyethylene facing
- Synthetic underlayment: Polypropylene or polyethylene woven materials
- Traditional felt: Organic or fiberglass-based for budget applications
- Liquid-applied membranes: Spray or roll-on systems for complex geometries
Material Compatibility Matrix:
- Verify galvanic compatibility between different metals
- Ensure sealant adhesion to all substrate materials
- Check thermal expansion compatibility across material interfaces
- Confirm chemical compatibility with building environment
Selection Criteria Priority:
- Environmental exposure – Choose materials rated for specific conditions
- Service life requirements – Match material life to building expectations
- Maintenance access – Consider replacement difficulty in material selection
- Budget constraints – Balance initial cost with lifecycle value
- Aesthetic requirements – Coordinate with overall building appearance
For projects requiring fire-rated sandwich panels, ensure valley flashing materials maintain fire resistance ratings and comply with building code requirements.
Sandwich Panel Valley Flashing Maintenance Tips
Regular maintenance of sandwich panel valley flashing prevents costly failures and extends system lifespan significantly. A systematic maintenance approach focusing on cleaning, inspection, and preventive repairs can double the effective service life of valley flashing systems.
Seasonal Maintenance Schedule:
Spring Maintenance (Post-Winter)
- Remove debris accumulated during winter months
- Inspect for ice damage or thermal stress cracking
- Check fastener tightness after freeze-thaw cycles
- Clean and inspect drainage outlets for blockages
- Document any damage requiring summer repair work
Summer Maintenance (Optimal Repair Season)
- Perform major repairs during dry weather conditions
- Renew sealants showing signs of deterioration
- Replace damaged flashing sections before fall rains
- Apply protective coatings if specified by manufacturer
- Update maintenance records and plan fall preparations
Fall Maintenance (Pre-Winter Preparation)
- Final cleaning of all drainage systems
- Install temporary leaf guards if deciduous trees present
- Secure loose components before winter weather
- Apply emergency sealant to minor cracks
- Stockpile emergency repair materials for winter use
Winter Maintenance (Emergency Response)
- Monitor for ice dam formation and address promptly
- Remove excessive snow loads that stress flashing
- Respond to leak reports with temporary measures
- Avoid major repairs unless absolutely necessary
- Plan spring repair priorities based on winter observations
Detailed Maintenance Procedures:
Cleaning Protocol:
- Safety preparation – Use proper fall protection and weather awareness
- Debris removal – Clear leaves, branches, and sediment from valleys
- Surface cleaning – Use mild detergent and soft brushes, avoid abrasives
- Drainage check – Flush valleys with water to verify proper flow
- Documentation – Photograph conditions before and after cleaning
Inspection Checklist:
| Component | Check For | Action If Found | Frequency |
|---|---|---|---|
| Sealant joints | Cracks, gaps, hardening | Clean and reseal | Every 6 months |
| Fasteners | Looseness, corrosion, missing washers | Tighten or replace | Annually |
| Flashing surface | Corrosion, dents, holes | Clean, treat, or patch | Annually |
| Drainage flow | Blockages, ponding, overflow | Clear obstructions | Every 6 months |
Preventive Repair Techniques:
- Minor sealant cracks: Clean out old material, prime surfaces, apply new sealant
- Loose fasteners: Remove, inspect hole condition, install larger fastener if needed
- Surface corrosion: Clean to bright metal, apply primer and topcoat
- Small holes: Use compatible metal patches with structural adhesive
Tool and Material Requirements:
- Basic tools: Cordless drill, sealant gun, wire brushes, cleaning supplies
- Safety equipment: Fall protection harness, non-slip footwear, weather radio
- Repair materials: Compatible sealants, fasteners, cleaning solvents, patches
- Documentation tools: Camera, measurement tools, maintenance log forms
Professional Service Indicators:
- Extensive damage requiring specialized equipment
- Safety concerns due to roof height or complexity
- Warranty work requiring manufacturer-approved procedures
- Structural modifications needed for proper repairs
Cost-Effective Maintenance Strategies:
- Combine valley maintenance with overall roof inspections
- Purchase maintenance materials in bulk for multiple buildings
- Train facility staff for basic maintenance tasks
- Establish relationships with qualified contractors for major work
Record Keeping Requirements:
- Maintain photographic records of system condition over time
- Document all maintenance activities with dates and materials used
- Track costs for budgeting and lifecycle analysis
- Preserve warranty documentation and compliance records
Proper maintenance significantly reduces the likelihood of emergency repairs and extends the effective service life of valley flashing systems. The sandwich panel installation service often includes maintenance training for building owners.
Do I Need Special Flashing for Curved Sandwich Panel Valleys
Curved sandwich panel valleys require specialized custom-formed flashing systems that cannot be achieved with standard straight valley products. Curved applications demand professional fabrication using specialized forming equipment and modified installation techniques to maintain watertight performance.
Curved Valley Requirements:
Geometric Considerations:
- Minimum radius limitations: Most flashing materials require minimum 3-meter radius for proper forming
- Compound curves: Multiple-axis curves need segmented flashing with sealed joints
- Tolerance requirements: Curved flashing must match panel geometry within ±5mm
- Thermal movement: Curves concentrate thermal stress requiring enhanced expansion provisions
Fabrication Methods:
| Curve Type | Fabrication Method | Material Limitations | Cost Factor |
|---|---|---|---|
| Simple radius | Roll forming or brake forming | 0.7mm max thickness | 1.5-2.0x standard |
| Compound curve | Segmented with sealed joints | Any thickness | 2.5-3.5x standard |
| Tight radius | Specialized forming dies | 0.5mm max thickness | 3.0-4.0x standard |
| Variable radius | Hand forming or CNC | Limited to soft materials | 4.0-5.0x standard |
Design Modifications for Curves:
- Segmented construction: Break long curves into manageable sections with expansion joints
- Enhanced sealing: Use structural adhesives in addition to mechanical sealants
- Increased overlap: Extend joint overlaps by 50% to accommodate curve geometry
- Flexible connections: Design fastening systems that accommodate curve movement
Installation Challenges:
- Template requirements: Create precise templates for field verification before fabrication
- Specialized tools: Curved installations require custom bending and forming tools
- Skilled labor: Installers need experience with curved metal forming techniques
- Quality control: More extensive testing required to verify watertight performance
Material Selection for Curves:
- Aluminum preferred: Superior formability and corrosion resistance for curved applications
- Softer tempers: Use H14 or softer tempers for tight radius applications
- Thickness limitations: Thinner materials form better but may require structural backing
- Sealant selection: Choose high-movement sealants rated for ±50% elongation
Alternative Solutions:
- Liquid-applied systems: Spray or roll-on waterproofing for complex curves
- Membrane systems: Flexible sheet membranes with heat-welded seams
- Hybrid approaches: Combine rigid flashing with flexible sealing systems
- Simplified geometry: Modify building design to reduce curve complexity
Cost Considerations:
- Custom fabrication adds 150-400% to material costs depending on complexity
- Installation time increases by 200-300% compared to straight valleys
- Specialized equipment rental and skilled labor premiums apply
- Testing and warranty requirements may increase project costs
Performance Expectations:
- Curved valleys require more frequent inspection and maintenance
- Service life may be reduced by 20-30% compared to straight installations
- Replacement costs are significantly higher due to custom fabrication requirements
- Consider lifecycle costs when evaluating curved vs. straight design alternatives
Design Recommendations:
- Minimize curve complexity during building design phase
- Specify adequate drainage capacity for curved valley flow characteristics
- Plan for enhanced maintenance access in curved areas
- Consider aesthetic alternatives that reduce flashing complexity
For complex curved applications, consult with experienced sandwich panel manufacturers early in the design phase to optimize both performance and cost-effectiveness.
Sandwich Panel Valley Flashing vs Traditional Roof Valleys
Sandwich panel valley flashing systems differ fundamentally from traditional roof valley applications in design requirements, installation methods, and performance characteristics. The primary differences stem from sandwich panel thickness, thermal properties, and structural attachment requirements that traditional valley systems cannot accommodate.
Dimensional Differences:
| Aspect | Traditional Valleys | Sandwich Panel Valleys | Impact |
|---|---|---|---|
| Material thickness | 15-30mm | 50-150mm | Requires custom flashing profiles |
| Flashing width | 300-400mm | 500-700mm | Increased material and labor costs |
| Overlap requirements | 100mm minimum | 150mm minimum | Enhanced weather protection |
| Fastener penetration | 20-25mm | 35-50mm | Specialized fastener requirements |
Structural Attachment Methods:
- Traditional systems: Attach to solid roof decking with standard fasteners
- Sandwich panels: Must penetrate panel core and reach structural substrate
- Load distribution: Sandwich panels require wider load distribution to prevent core crushing
- Thermal bridging: Panel systems need thermal breaks to maintain insulation performance
Installation Sequence Differences:
- Traditional: Valley flashing installed after roof deck completion, before shingle installation
- Sandwich panels: Valley flashing must be coordinated with panel installation sequence
- Access requirements: Panel systems often require specialized lifting equipment
- Quality control: Sandwich panel valleys need enhanced testing due to complexity
Performance Characteristics:
Thermal Performance:
- Traditional valleys create minimal thermal impact on overall roof performance
- Sandwich panel valleys can create thermal bridges if not properly detailed
- Insulation continuity is critical in panel systems but not in traditional applications
- Condensation control requires different approaches in panel vs. traditional systems
Water Management:
- Traditional valleys rely primarily on gravity drainage and shingle overlap
- Sandwich panel valleys need mechanical sealing due to panel joint characteristics
- Drainage capacity calculations differ due to panel surface characteristics
- Backup waterproofing is more critical in panel applications
Maintenance Requirements:
- Traditional valleys are typically accessible for maintenance and repair
- Sandwich panel valleys may require panel removal for major repairs
- Sealant renewal is more critical in panel systems due to thermal movement
- Traditional systems often allow partial repairs while panel systems may need complete sections
Cost Comparison:
Initial Installation:
- Traditional valley flashing: $8-15 per linear meter
- Sandwich panel valley flashing: $15-35 per linear meter
- Installation labor: 50-100% higher for panel systems
- Specialized tools and equipment add to project costs
Lifecycle Costs:
- Traditional systems: Lower initial cost, moderate maintenance
- Panel systems: Higher initial cost, potentially higher maintenance complexity
- Energy performance: Panel systems provide superior thermal performance
- Replacement costs: Panel systems significantly more expensive to replace
Design Flexibility:
- Traditional valleys accommodate standard roofing materials and methods
- Panel valleys require coordination between multiple building systems
- Retrofit applications are simpler with traditional systems
- Panel systems offer superior energy performance but less design flexibility
Selection Criteria:
- Choose traditional valleys for conventional roofing applications, retrofit projects, budget-constrained applications
- Choose sandwich panel valleys for energy-efficient buildings, industrial applications, integrated building systems
- Consider hybrid approaches for projects requiring both energy performance and cost control
- Evaluate lifecycle costs including energy savings from improved thermal performance
Professional Recommendations:
- Engage experienced contractors familiar with sandwich panel systems
- Coordinate valley design with overall building thermal performance goals
- Plan for enhanced maintenance requirements in panel systems
- Consider long-term building performance goals in system selection
The choice between traditional and sandwich panel valley systems should align with overall building performance goals and budget considerations. For new construction prioritizing energy efficiency, sandwich panel systems typically provide superior long-term value despite higher initial costs.
FAQ
How long does sandwich panel valley flashing typically last?
Sandwich panel valley flashing typically lasts 20-25 years with proper installation and maintenance. Aluminum systems may reach 25-30 years in moderate climates, while galvanized steel systems average 20-25 years. Sealant components require renewal every 10-15 years regardless of flashing material choice.
Can I install sandwich panel valley flashing myself?
DIY installation is not recommended for sandwich panel valley flashing due to safety risks, specialized tool requirements, and warranty implications. Professional installation ensures proper sealing, structural attachment, and compliance with building codes. Mistakes can result in costly water damage and void manufacturer warranties.
What happens if valley flashing fails during warranty period?
Warranty coverage depends on failure cause and installation compliance. Manufacturing defects are typically covered for 15-25 years, while installation errors may void coverage. Document all installation details and maintain regular inspection records to support warranty claims. Contact the manufacturer immediately upon discovering failures.
How much does emergency valley flashing repair cost?
Emergency repairs typically cost 150-300% more than planned maintenance due to urgency, weather conditions, and temporary protection requirements. Minor emergency sealant repairs range from $200-500, while major flashing replacement can exceed $2000-5000 depending on access and complexity.
Do curved roofs require special valley flashing design?
Yes, curved sandwich panel roofs require custom-fabricated valley flashing systems that cannot be achieved with standard products. Curved applications need specialized forming equipment, modified installation techniques, and enhanced sealing methods. Costs typically increase by 150-400% compared to straight valley installations.
What tools are needed for valley flashing maintenance?
Basic maintenance requires cordless drill, sealant gun, wire brushes, cleaning supplies, and safety equipment including fall protection. Professional repairs may need specialized forming tools, lifting equipment, and testing instruments. Maintain emergency repair materials including compatible sealants and fasteners.
How do I know if my valley flashing needs replacement?
Replace valley flashing when multiple active leaks occur, structural damage is visible, or more than 40% of the system shows deterioration. Warning signs include widespread sealant failure, significant corrosion, repeated repair needs, and safety hazards. Professional assessment recommended for borderline conditions.
Can valley flashing be repaired in winter weather?
Winter repairs are limited to emergency measures due to sealant curing requirements and safety concerns. Temporary patches and drainage improvements can be performed, but permanent repairs should wait for dry weather above 5°C. Plan major repairs during spring and summer months.
What causes most valley flashing failures?
Most failures result from installation errors including inadequate sealing (35%), improper fastening (25%), insufficient drainage design (20%), and material incompatibility (15%). Manufacturing defects account for less than 5% of failures. Proper installation and maintenance prevent most problems.
How often should valley flashing be inspected?
Inspect valley flashing every 6 months for visual damage and debris accumulation. Conduct detailed annual inspections of sealants and fasteners. Professional assessments every 3-5 years help identify developing problems before they become costly failures. Increase frequency in harsh environmental conditions.
Is valley flashing covered by building insurance?
Insurance coverage varies by policy and failure cause. Sudden damage from storms or accidents is typically covered, while gradual deterioration from lack of maintenance may not be. Document regular maintenance activities and keep installation records to support insurance claims when needed.
What sealant works best with aluminum valley flashing?
Structural acrylic sealants provide optimal performance with aluminum flashing, offering 20-25 year service life and excellent adhesion. Polyurethane sealants work well for high-movement applications, while silicone excels in extreme temperature conditions. Avoid petroleum-based sealants that may not bond properly to aluminum surfaces.
Conclusion
Sandwich panel roof valley flashing detail represents a critical component in modern building construction that requires specialized knowledge, materials, and installation techniques. The unique characteristics of sandwich panels – including their thickness, thermal properties, and structural requirements – demand custom-designed flashing systems that differ significantly from traditional roofing applications.
Success in sandwich panel valley flashing depends on several key factors: selecting appropriate materials like aluminum flashing with structural sealants, following proper installation sequences that coordinate with panel placement, and implementing regular maintenance programs that extend system lifespan. The investment in quality materials and professional installation typically pays dividends through reduced maintenance costs and superior long-term performance.
Take these immediate action steps to ensure optimal valley flashing performance: First, engage experienced contractors familiar with sandwich panel systems during the design phase. Second, specify materials appropriate for your environmental conditions and service life requirements. Third, establish a maintenance schedule that includes biannual inspections and prompt repair of minor issues before they become major problems.
For building owners and contractors working with sandwich panel systems, understanding these valley flashing requirements is essential for creating durable, weather-tight building envelopes that perform effectively for decades. The higher initial investment in proper valley flashing design and installation prevents costly failures and maintains building performance throughout its service life.
SEO Meta Title: Sandwich Panel Roof Valley Flashing Detail: Complete Guide 2026